Showing posts with label piCturepOlish. Show all posts

Friday, October 2, 2015

Swatch & Review: Picture Polish Bordeaux & Ornate

Hi guys!

I hope you all still remember me. Yes, I've been MIA for a little while, had personal issues going on and felt like I need to take a break from everything.  But things are better now, and I've been busy taking care of a puppy for the past 2 weeks. Yes! I finally got a puppy! Gosh she is an adorable little monster! Her name is Luna, and she is now 10 weeks old. She's a mix of Shiba Inu and Bichon. My little bundle of joy, and terror (sometimes, lol).

Anyway... Today I have 2 new Picture Polish collaboration shade to share with you guys, Bordeaux and Ornate. As you probably know, Picture Polish is one of my favorite brand. I'm never disappointed by the quality, beautiful shades and awesome formula. 

Bordeaux, is a deep red with scattered holo and flecks. It has great opacity despite of the squishy jelly finish. Dries very shiny and smooth. I used 2 coats on my swatches here, without top coat, just to show you how shiny it is. The first coat on my middle finger is slightly thicker than the rest, just in case you're wondering why it seems darker than the rest.
picture-polish-bordeaux

picture-polish-bordeaux

picture-polish-bordeaux

picture-polish-bordeaux


Ornate, is a purple scattered holo (it leans pink in some light, but mostly looks purple to me), with small gold and pink hex glitter. I love this combination, so gorgeous! It applies very easy. Other than shaking the bottle before use, I didn't try to fish the glitter out or anything. Every dip of a brush has just enough glitter on it. 
Opaque in just 2 coats, which is what I used here. I used one coat of HK Girl top coat. You might need 2 if you want a completely smooth surface. I can feel a very slightly texture after the top coat dries.
picture-polish-ornate

picture-polish-ornate

picture-polish-ornate

picture-polish-ornate

For once I didn't use artificial lighting for my swatches! All pics were taken using natural indoor lighting. I kinda like it, but can't really rely on the sun now that fall is here. I'm just enjoying whatever sunny days we have left.

Where to buy: Harlow & Co. or Picture Polish

Also, you might want to check out Harlow & Co. on Instagram, and go ahead and follow them. Katie is holding a fabulous giveaway there, make sure to enter! :)


**products were sent for my honest review

XO
Novi

Monday, June 15, 2015

Summer Gradient & Stamping with Picture Polish and Born Pretty BP-L017

Hi guys! I'm back from the weekend, finished the third season of Orange is The New Black, twice. Yeah, I've had a productive weekend :p
Today I did a quite simple nail art, a gradient and stamping. The colours and plate I chose has a very summery themed. Perfect for the sunny days we have here. 

I'm also reviewing a Born Pretty Store plate that was sent to me a little while ago. Plate BP-L017, which can be found in this link, is a beach themed plate, complete from palm trees on the beach, sea shell, starfish, to underwater scenes. I had no issues with picking up the image, though I admit I was a bit lazy in wiping the plate clean between stamping so the image picked up stay clean and sharp. So the imperfection you may see here is purely my own fault. 
As you can see, I picked the starfish and palm trees design to use here. I also use a cute octopus design on my right hand. I stamped the designs using Mundo de Unas white, over a Picture Polish gradient, Coral Reef and Totes.


Don't forget, you can use my code NVG10 to get 10% off from your purchase at BornPrettyStore.com. They have variety of stamping plates, that I grow to love, plus a ton of other nail art stuff at affordable price.


**stamping plate was provided for my honest review

XO
Novi

Monday, April 20, 2015

Gradient Roses

Happy Monday! Today I have a somewhat bright manicure, inspired by pic of a cake I saw someone posted on a facebook thread. The cake was decorated with roses all over it, but in a gradient teal shades. Very pretty! I'd feel bad eating it. 
I never quite get how to make a pretty roses, I saw it on others all the time and wish mine would turn out that good. But, I'm pretty satisfied with these!
The 3 roses shades I used are  Picture Polish Marine, Cirque Lady Liberty, and Picture Polish Tiffany. The darkest teal shade on the roses is OPI Ski Teal We Drop.
On the other 3 nails, I used Cirque Lady Liberty as the base colour, and Picture Polish Tiffany for the roses, accented with Cirque Vigo and Picture Polish Marine. 


XO
Novi

Thursday, March 26, 2015

Color Burst Stamping With Born Pretty Plate BP-11

Hi guys! Today I did another colorful mani, using all piCture pOlish shades and stamped with Born Pretty Plate BP-11. The plate was sent to me for review, and I love all the large images they have on that plate, you can see it in one of the picture below or find it in this link (don't forget you can use my coupon code NVG10 to get 10% off).

The base for my stamping is a sponged mani with these following shades, Sizzle, Cyan, Paris, Whimsy, Forget Me Not, Honeymoon. I used Color Club Beyond to stamp the image I chose from this plate. I really adore the finished look, but oh my gosh.. clean up was hell! Even with the glue I used to protect around my nails, it still took a lot of time to clean up the rest. I have curved nails and deep sides, the tiny silver flakes (which all of these polishes have) were so stubborn to remove. Ok, enough rant! Lol!


And here's the sponged mani before stamping, isn't it lovely?


XO
Novi

Wednesday, March 11, 2015

Born Pretty Store Stamping Plate Review - BP-L 004

Hi guys! Today I have another stamping plate review from Born Pretty Store. I created a stamping decal using one of the designs from plate BP-L 004, which you can find in this link, and you can use my code NVG10 to take 10% off your purchase.

I cannot say this for every single design on this plate, since I haven't tried them all. But the one I used picked up really easy. I used Mundo de Unas Black and Konad stamper. 
The plate has 21 designs, on a rectangular plate with a pink plastic backing and paper sleeve. 
The plate measurement is 12cmx6cm. The plastic backing add 1cm to the total measurement, 13cmx7cm. The design size is 1,5cmx1,7cm. The width is more than enough to fit my nails, even the thumb. The height is just enough for my current length, and a bit short to fit my thumb. 
I used the design on the top row, far right. 
I used more than a dozen polishes for this decals, I started with 7 polishes and find myself going back and forth to my melmer for more polish. I added half moon design after I put on the decals, wanted to use glitter instead of dots around the moon but couldn't find anything I like for it. 
Here's a list of polishes I used, by brands:
A England: Encore Margot, GLoriana, Fotheringhay Castle
Glam Polish: Fantasies Come True, Whirlwind, Polar Lights, Below Zero
Girly Bits: Our Lips are Sealed, Selfie Bomb, Mint-al Precision.
OPI: My Signature is DC
Picture Polish: Monroe, Tail Feather, Whimsy, Cyan, Kryptonite, Forget Me Not


I'm really loving this mani. So colorful and sparkly! My kind of nails :)

**Stamping plate was sent for my honest review

XO
Novi

Wednesday, March 4, 2015

Sparkly Tie Dye Cyclone

Hi guys! Today I bust out another untried and tried out a nail art look that I've been meaning to try for a while. I'm not 100% sure if I like the result, but I don't hate it so I'm keeping it. 
I used all Picture Polish shades here. Coral Reef for the base colour, Beige and Swagger for the tie dye cylone (done with Winstonia Kolinsky brush #0000), and topped with Holiday and Gloss on Top! top coat.
I like that Holiday mellow down the base colour a bit, but it also hides the tie dye effect. What do you think? I'm lovin the sparkles though.

And here's Coral Reef on its own, 2 coats without top coat.
pitcure-polish-coral-reef
piCture pOlish Coral Reef

XO
Novi

Monday, March 2, 2015

Born Pretty Store QGirl-033 Plate Review & Nail Art

Hi guys! Recently I received several stamping plates from BornPrettyStore to review. So today I'm creating a nail art look with one of the plates, I'm also mixed it up with some chevron vinyls cause for some reason I kept messing up my stamping today and ran out of patience to keep re-doing them.


The design I picked for today's mani is the zigzag one at the bottom of the plate as pictured above. I had no problem with picking up the image itself, and I really like a few other designs from this plate. I just wish they didn't place the designs so close to each other like that. But, if you're stamping with Mundo de Unas, a quick lift with scotch tape on the stamper for the part you don't want will fix the problem. 
You can find this Qgirl-033 plate in this link, and you can also use my code NVG10 to take 10% off your total purchase. 
The polishes I used in this mani are KBShimmer Blush Money, KBShimmer Rust No One, ILNP Mega, and Picture Polish Monroe


XO
Novi

Monday, February 16, 2015

piCture pOlish Fool's Gold

Happy Monday! Today I barely had the energy to sit at my desk long enough to do nail art, so I'm just gonna share some swatches. I went through my untried stash and pulled one out,   piCture pOlish Fool's Gold
It's a turquoise crelly base with the perfect amount of squishiness to show off the tiny gold glitters from each layer. I used 3 thin coats and top coat here. No issues at all with application. 
piCture pOlish Fool's Gold

piCture pOlish Fool's Gold

piCture pOlish Fool's Gold
See you next time!

XO
Novi

Wednesday, February 11, 2015

Layered Hearts

Happy Hump Day! Today I'm using another one of my untried, piCture pOlish Tail Feather. I don't know why I didn't wear it until now, it's a bright pastel green with their signature sparkles. I can totally see myself wearing this again come spring.
The formula is a bit sheer, I needed 3 coats for full opacity. But it applies easily, just like most piCture pOlish formula.
I also did a nail art with a few other piCture pOlish shades. I think it's kinda cute, but it's one of those nail art that look better at arms length. 

I painted the layered hearts with piCture pOlish Forget Me Not, Cyan, Sizzle, and Frosting. Sealed with piCture pOlish Gloss on Top!.

Here's Tail Feather on it's own, 3 thin coats without top coat.
piCture pOlish Tail Feather
So, are we bored with V-Day nails yet? Cause I might do another one! Haha.. Another time!

XO
Novi

Sunday, February 8, 2015

Purple Hearts

Hi guys! I'm back! Sorry for the sudden disappearance. The bf had the entire week off, so I was a bit occupied, spending more quality time with him :). I had the same polish on for almost a week and just changed them yesterday for my day out on Sunday. I told a friend to pick a colour to get me started, and she picked lilac. I took out a bunch of my lilac/purple polish and ended up with this..
Although it doesn't really show, I used 4 shades of purple/lilac for the gradient, OPI Do You Lilac It?, KBShimmer Hugs and Wishes, piCture pOlish Twinkle, and OPI Rumple's Wiggin which I also used for the gradient base. 
I painted little hearts using piCture pOlish Violet Femme and a detail brush on my index and pinkie, and stamped the knitted heart image from Bundle Monster plate H01 using Color Club Eternal Beauty. I sealed everything with one coat of HK Girl top coat.


I think this is cute enough to wear for Valentine's Day if you're already pink overload with a million other V-day nails floating around online :)


XO
Novi

Monday, January 12, 2015

Stripey Monday Mani

Happy Monday! Today I went nuts with striping tape again, after trying and removing several nail art look. I was this close to just slap on a color and call it a day. I just couldn't seem to be happy with my work, but I finally settled with this one otherwise I'd be glued to my desk all day. 

I used all piCture pOlish shades for this mani. The base colour is Paris, and the stripes are Forget Me Not and Cyan. This is a fairly easy look to accomplish, if you don't mind working with striping tape. The easier way is to use straight vinyls, which unfortunately I don't have.


Hope you're all having a great start of the week. I'll see you on the next post!


XO
Novi

Friday, January 9, 2015

Born Pretty Store Stamping Plate Review - Snoopy Nail Art

Happy Friday! Today I have another Born Pretty Store product review with a nail art to go with it. The images on the plate are all so adorable! But I'm biased, cause I love Snoopy. I have tried almost all of them, and they picked up really nicely using my konad hard stamper. 

The background for my stamping is a gradient using piCture pOlish Sky, OPI Rumple's Wiggin, and Orly Snowcone. The dots on my thumb, index, and pinkie are OPI Sparrow Me The DramaI made snoopy decals using Mundo de Unas Black and filled them with Cirque Carpe Diem. The hearts are stamped with Mundo de Unas Mexican Pink.

Unfortunately, I couldn't find this plate on their site anymore to link it for you, but they have a great selection of stamping plates to choose from, all with affordable prices! You can check out their plates selection here. You can also get 10% off your purchase for regular priced items using my code NVG10.


Do you love Snoopy? I think I'll be keeping this mani for the weekend :)


**stamping plate used in this post was provided for my honest review

XO
Novi

Wednesday, December 17, 2014

Funky Distressed French featuring Born Pretty Store Bow Studs

Hi everyone! It's 8 days before christmas, whoa time flies really quick. Have you finished your christmas shopping yet? I have not :p Should get them done this week, I hope..

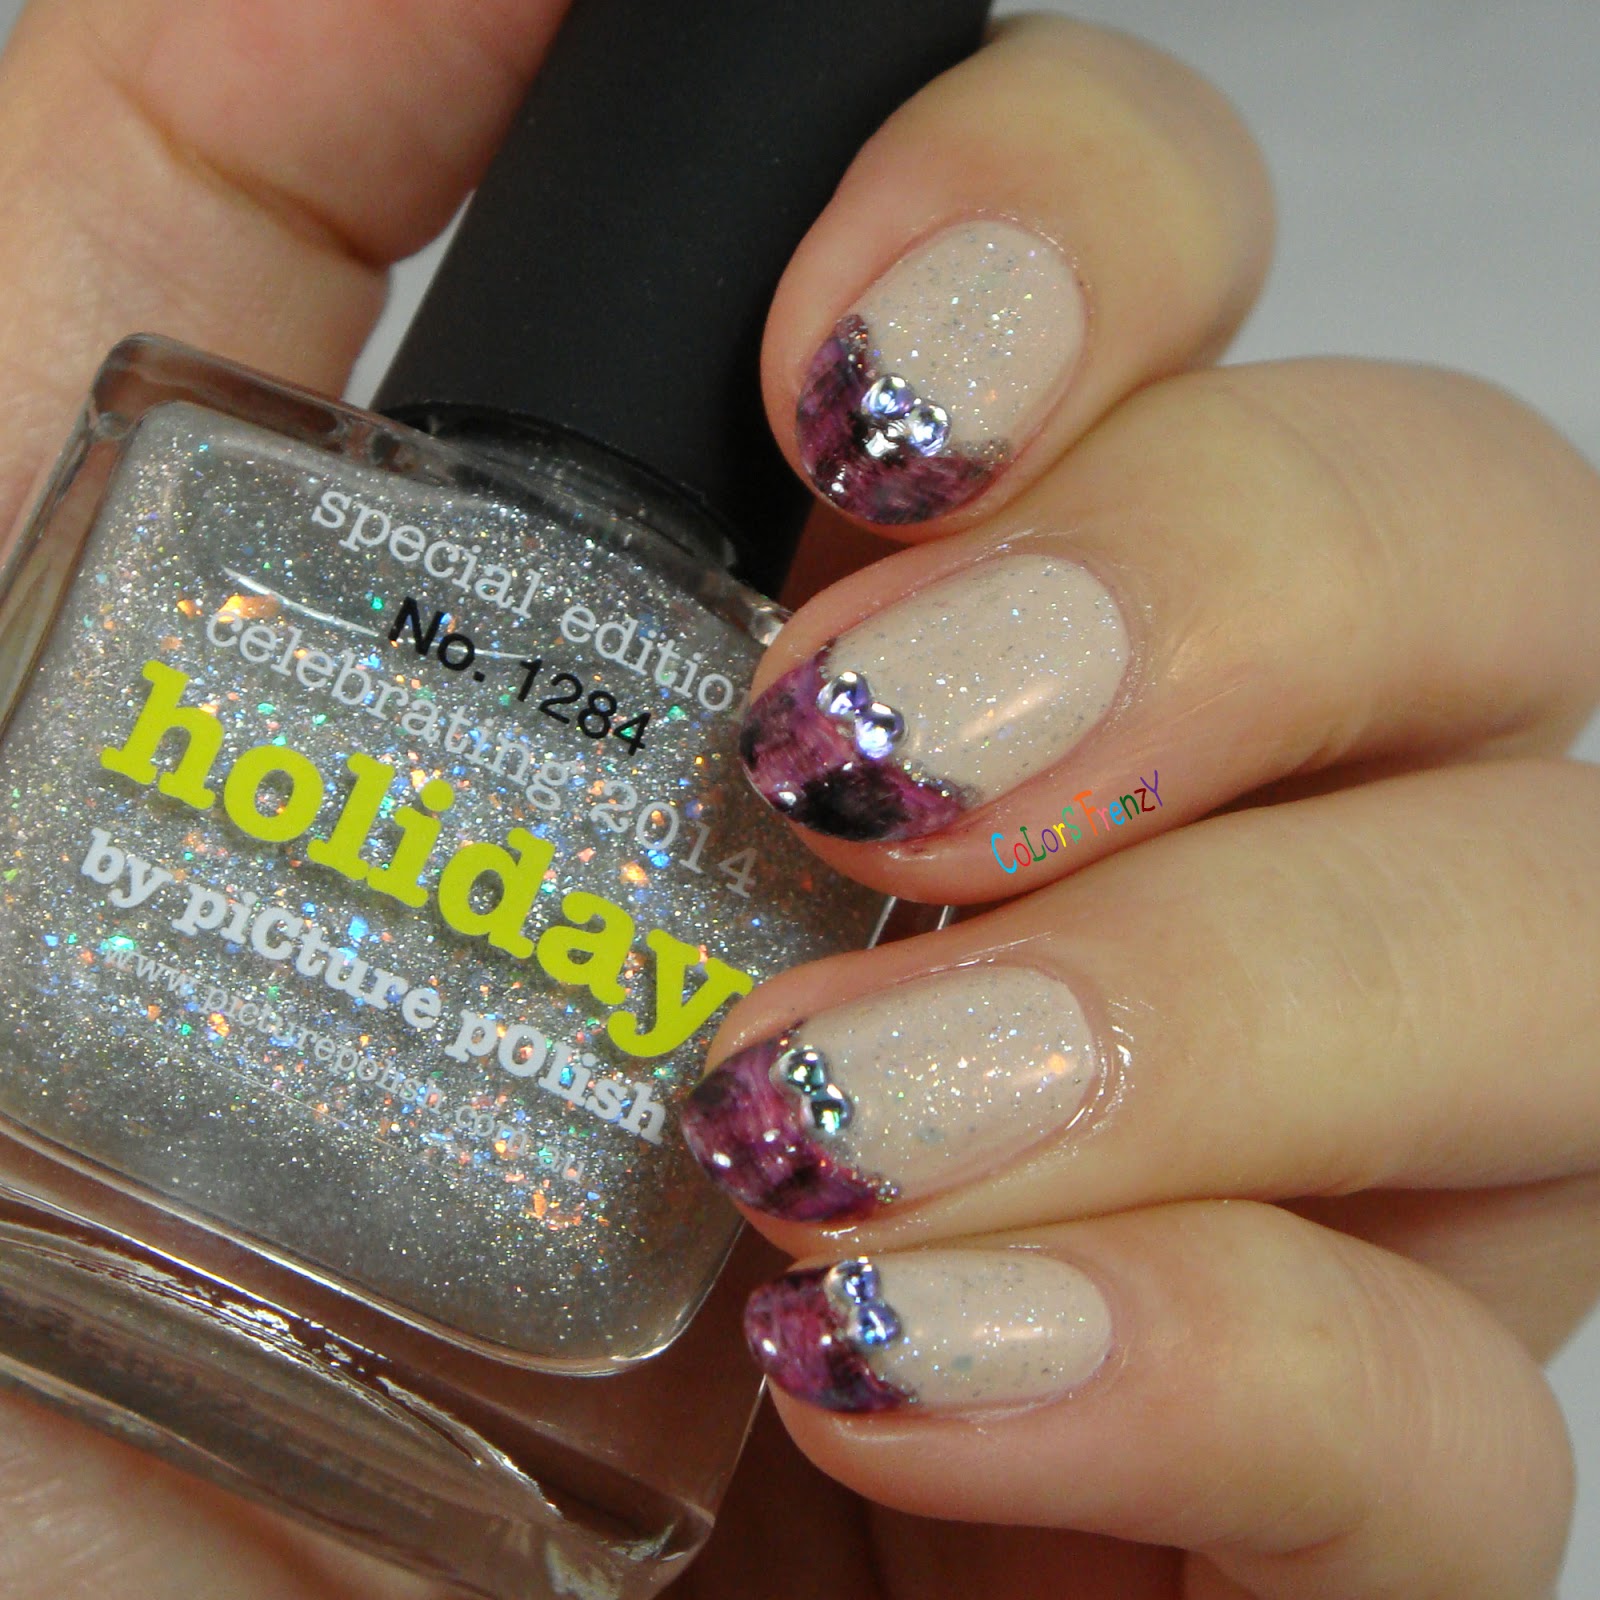
Anyway, today I have a pretty simple nail art to share with you. I'm calling it a distressed french mani, because well.. the french part is done with a distressed technique. 
The base color is piCture pOlish Beige, topped with the new LE Holiday. I used a flat end brush to do the french and several polishes (OPI Sleigh Parking Only, OPI I Carol About You, piCture pOlish Sizzle, and Cirque Memento Mori). I added a little bit of glitter on the smile lines using OPI My Voice is a Little Norse. 
To sweeten it a bit, I add a tiny bow stud on each nail, then sealed everything with HK Girl top coat.. The studs are from Born Pretty Store, and you can find it here. There are 250 studs in the set for only $3.70. You can also use my code NVG10 to get a 10% off of regular priced items.


How do you feel about french mani? Honestly, this is totally not my style, but I like to do it once in a while to see if I changed my mind about it. Haha.. nope, still not my style.

XO
Novi