Showing posts with label Zoya. Show all posts

Monday, March 30, 2015

Four Seasons Owls

Happy Monday! Today I have four adorable owls on my nails, each representing a season. I just finished an owl amigurumi yesterday, that's probably why I still have owls on my mind. I know there are people who obsessed with everything owl, if that's you, I hope you like this mani! :)

I used around 20 different shades for this mani, and silly me, I've put them all back in the drawers and forgot to write down all the names. Doh! The 2 bottles I'm holding in my pics here are OPI My Vampire is Buff and Zoya Micky. I used a bunch of shades from OPI, Zoya, and Picture Polish.


Did you notice anything missing? I've only realized it as I'm writing this post that I forgot to give them feet! Poor owls, forgive me.. Lol!

XO
Novi

Wednesday, September 3, 2014

Monochromatic Stripes

Today's mani is just a simple stripes of blues. When I said simple, I didn't mean it's easy or quick, lol. I used 6 different blues and free handed them using a nail art brush. They are not perfect, especially when you're looking at them up close here. In person though, they looked pretty awesome ;)

Polishes used starting from tips: piCture pOlish Sky, OPI Can't Find My Czhechbook, Zoya Yummy, piCTure pOlish Swagger, Nails Inc Baker Street, and OPI Eurso..Euro for the thin lines. 


XO
Novi

Friday, June 13, 2014

Floral Nails

As summer approaching, I'm seeing more and more of floral nail art. It's not something I'm particularly good at, I seriously have trouble even making a dotted flower. But it doesn't stop me from trying, so please be gentle ;)


I started with KB Shimmer Honeydew List as the base, a dusty light green that's opaque in 3 coats. For the flowers, I used a flat end brush and a combination of these shades: Picture Polish Violet Femme, Flirt, Zoya Thandie, Darcy, Chantal, OPI My Boyfriend Scales The Walls and Jade is The New Black for the green stems. 


I think they came out pretty nice, if you don't pay too much attention to the details..haha. It has a bit of vintage look to it, which I now think matte top coat would be perfect for this. What do you think? :)

XO
Novi

Tuesday, April 15, 2014

Easter With Silly Bunny and Chick

Another easter themed mani for ya! I created this mani as an entry for Easter Nail Art hosted by Nail Polish Canada. So, if you like it, please take the time to vote for me :)


It seems bunny and chick are a little confused, they probably think this is halloween instead of easter. So they play dressed up, as each other! (It was funnier in my head).


Short explanation for each nail, including polishes used:
The chick in bunny costume and the little bunny eating carrot and chillaxing in a piece of broken easter egg were hand painted over a water color background with OPI Sheer Tints. Polishes used: Butter London Cotton Buds, Pimms, Silly Billy, OPI Pink Friday, China Glaze Liquid Leather, Picture Polish Sky, Peaches n' Cream.
Index easter egg created with Picture Polish Sky as the base color, the pattern was hand painted with Picture Polish Wisteria, OPI Pink Friday, Can't Find My Czechbook.
Pinkie easter egg created with Picture Polish Peaches n' Cream, the pattern was hand painted with Butter London Pimms, Picture Polish Sky and Tiffany.
For the thumb, the background is using a saran wrap technique and layered with a think coat of OPI I Can Teal You Like Me. The Grass was painted with Zoya Josie, the 2 eggs are with Picture Polish Peaches n' Cream and Wisteria.
All nails but the middle were top coated with Glisten & Glow HK Girl top coat. I used KB Shimmer Clearly On Top on my middle ail, and it smeared a tiny bit. 


The contest is open until tomorrow if you're interested in participating. It's open to everybody in US and Canada, not limited to blogger only. You can enter (and vote) through this link

XO
Novi


Saturday, March 22, 2014

Weekend Glittery Gradient

Hi guys! Hope you're enjoying you weekend, I sure am! :) I'm rocking this fun and colorful gradient mani that I reeeally love. Gradient is probably my favorite kinda nail art, easy to do, although I admit I hate doing the clean up. But seeing the result makes it all worth it. 

I use a make up wedge to do my gradient, over a white base. Instead of using Northern Lights or Fairy Dust like what I usually do with my gradient, I chose a chunkier glitter as a topper. I will list all the colors I used at the end of the post.


Here's the gradient without the glitter. I like them either way :)


Products used:
Base/top coat: Duri Rejuvocate/Glisten & Glow HK Girl
OPI My Boyfriend Scales The Walls
OPI Hey Baby
OPI Need Sunglasses
Color Club East Austin
OPI Mermaid's Tears
Zoya Yummy
OPI Do You Lilca It?
OPI In True Stefani Fashion

XO
Novi

Wednesday, March 19, 2014

Blue Dotticure

Happy hump day! Today I have a simple but oh so cute mani, until I ruined it by adding bows, lol! I did a quick mani last night with Zoya Yummy, but then decided to do a simple dots with Zoya Chantal. I love this combo.
The thing with dotticure, I always call it 'simple' and it might be true as far as the look. But I don't think the process is as easy as it looks, at least not for me. It's not easy to create the same size dots and placed them in a uniform spaces. One twitch and you'd ruin it. Even worse when working on my dominant hand, I think I forgot to breathe a couple times just to keep my hand steady lol.

(Sorry for the odd looking skin color, all my pics came out this way today, fml!)


I woke up thinking it would be cute to add a bow to my existing dots. It looked better in my head. I used Zoya Charisma and Zoya Micky for the bows. All sealed off with HK Girl top coat.


Have a lovely day and thanks for stopping by! :)

XO
Novi
Saturday, March 15, 2014

St, Patrick's Day Nail Art

I'm always glad when there's a theme that I can use as inspiration for a nail art, less thinking to do. This is my first St. Patricks day mani, and I tried to incorporate everything I can think of related to this holiday. Shamrock, rainbow, pot of gold, and a leprechaun holding a beer (just in case you couldn't make out what I tried to paint there,lol. It's a sad attempt). I only noticed while editing the pics, that the rainbow on my index don't aligned with my middle nail. Not a big deal, I know.. Still, it bugs me, but I'm too lazy to take another pics :p


The background is a saran wrap mani using blue and white polishes over a white base. Here's the list of all polishes I used for this mani:
OPI My Boyfriend Scales The Walls
OPI Red My Fortune Cookie
OPI Jade is The New Black
OPI You Don't Know Jacques
OPI Love.Angel.Music.Baby
Zoya Thandie
Zoya Darcy
Zoya Josie
Zoya Yummy
Zoya Chantal
Zoya Taylor
China Glaze Liquid Leather
China Glaze Fairy Dust
Color Club Pucci-licious
Colos by Llarowe Behead The Drama Queen
Lynnderella Change


Have a fun long weekend and have a Sham-Rocking Day!! (just in case I'm not posing on Monday)

XO
Novi

Tuesday, March 11, 2014

Random Tribal Print

Ok, I didn't really know what to call this mani. So I'm calling it that. I didn't really have anything specific in mind (or maybe too many and I can't decide), I just wanted to do some free hand nail art. So I just started with a blank white canvas and went from there. I almost removed them because I thought it looked like crap, but I decided against it, and just added more colors. In the end, I'm glad I didn't remove them. I quite like them :).

I used mostly OPI in this, and a few from other brands like Zoya, China Glaze, and Color Club. I will list the products I used at the end of the post. I used Berkeley small detail brush for the design, and my trimmed brush I got from Michael's for the black doodles .


With matte top coat

Product used:
Base/top coat Glisten & Glow Stuck On Blue/HK Girl
OPI My Boyfriend Scales The Wall
OPI Fly
OPI Hey Baby
OPI Need Sunglasses
OPI Mermaid's Tears
OPI Did It On 'Em
OPI Funkey Dunky
Zoya Charisma
Zoya Yummy
China Glaze Liquid Leather
Color Club East Austin
Butter London Matter Top Coat

XO
Novi

Tuesday, March 4, 2014

Zoya Naturel Collection Nail Art

Hi guys!

I didn't realize until after I'm done, my new mani has a similar palette with my previous one. I'm gonna need to use a bright and colorful polishes soon. 
I felt like I need to practice my dotting and free handing swirls, so I'm using both on today's nail art. All the polishes I used today are from Zoya Naturel collection. The brush I used here is Berkeley short detail nail art brush, I got it from Nail Polish Canada


I`m keeping this post short, since I`m having a terrible headache. But hey, at least my nails are pretty ;)

XO
Novita

Monday, February 17, 2014

Stamping Over Rainbow Artsy Backround (with Tutorial)

Hi guys!

Today I have a colorful stamping mani, and a tutorial for you. I've had request to do tutorial for the background of one of my valentines day mani, here. Which is great, cause I was planning to do one myself, just wasn't sure if there's any interest. You'll see that it's really easy and it makes an awesome background for your nail art, or you can just wear it as is or maybe add some fairy dust to it. 
In my previous mani, I used several shades of pinks and red, and a purple. This time I'm using rainbow colors, my favorite! I also stamped over them with Pueen 47 plate and my thick and goopy CND Blackjack. I'm so happy I didn't throw it out, it turned out to be an excellent stamping polish!


The polishes I used here are: OPI My Boyfriend Scales The Walls (white base), OPI Hey Baby, Zoya Darcy, Zoya Josie, Zoya Ricky, Color Club Pucci-licious, and HK Girl top coat.

Here's the step by step pictorial:


(not pictured) Paint all your nails with a white polish, and let it dry.

  1.  Drop a blob of each color you used on a tin foil. The brush I used here is a flat nail art brush. Also, set aside polish remover on a small dish to clean your brush
  2. Over a dry white base, with the first color (here it's pink) randomly do a one stroke with your brush creating several rectangle shape. Do it vertically and horizontally. You might need to dip the brush in remover and wipe it dry on a paper towel before moving to the next color.
  3. Repeat step 2, with the second color (Here it's purple). You can overlap the stroke with the existing ones.
  4. Repeat step 2 with color #3 (here it's green).
  5. Repeat step 2 with color #4 (here it's blue).
  6. Repeat step 2  with color #5 (here it's yellow).
  7. After I did step 2 with all the colors, I went back and repeat the same thing on some of the rectangles, using just light strokes just to make the white background not too visible. This step is optional, if you're happy with how it looks, then you can skip this step. 
  8. Do the clean up (if needed), and add top coat. I like to add top coat right away after I finished each nail. Adding top coat while the polish is not completely dry, kinda soften the brush strokes. But this is also optional.
And that's it!


You can use whatever colors you like, there's no right or wrong in doing this. Which is why I like it a lot. I hope my explanation is clear enough, and if it's not, feel free to shoot me a question in the comment :)
What do you think? Will you be trying this?

XO
Novi

Saturday, December 7, 2013

Christmas Ornament

Hi guys!

Today I have another christmas themed nail art to share with you. I created this mani as an entry for Nail Polish Canada holiday nail art challenge, and the theme is 'Decorations'. I had a few other ideas before I finally decided to do this one. I like it cause it's pretty simple but I can make it colorful, and it's also very christmas-y. The decoration I picked is christmas ornaments. I was inspired by The Nail Network nail polish christmas ornaments.


My background is a gradient, using OPI Yoga-ta Get This Blue and What's With The Cattitude over a white base. All the ornaments were free-handed, started with a white polish. Colors used for the ornaments are: OPI Under The Mistletoe, OPI It's Frosty Outside, OPI Goldeneye, OPI< Catch Me In Your Net, OPI This Gown Needs a Crown,  Zoya Arabella, CbL Monkey See Monkey Do, CbL, Behead The Drama Queen, Picture Polish Imperial, Picture Polish Metallic Mush. Finished off with Glisten & Glog HK Girl top coat.


This turned out better than I expected, and i really love it! If you love it too, please vote for my mani here, I'm #36! I would really appreciate your support <3

XO
Novi


Monday, September 16, 2013

31DC2013 Day 16: Tribal Print

Hi guys!

Another day, another challenge mani! Today I have a tribal print mani to share with you. Tribal print has never been one of my favorite nail art look. But today, I tried to create my interpretation of it in a way that I would like it myself. So here's hoping that you guys would like it. If not, that's ok too! :)


My base for this mani created using a saran wrap method. I painted all nails with China Glaze Surreal Appeal, and then dabbed several colors on (China Glaze Aquadelic, Zoya Darcy, Zoya Thandie) it using a small pieces of saran wrap/cling wrap, and top coat it. For some reason, I feel the need to add Northern Lights on it, lol. 
After everything has dried, I free-handed the tribal pattern using a small detail brush. The polishes used for the prints are OPI Incognito in Sausalito and OPI My Vampire Is Buff.


What do you think? Do they fit in tribal print category? ;)

XO
Novi

Friday, August 30, 2013

My Picks of Zoya Fall 2013 Pixie Dust

Hi guys!

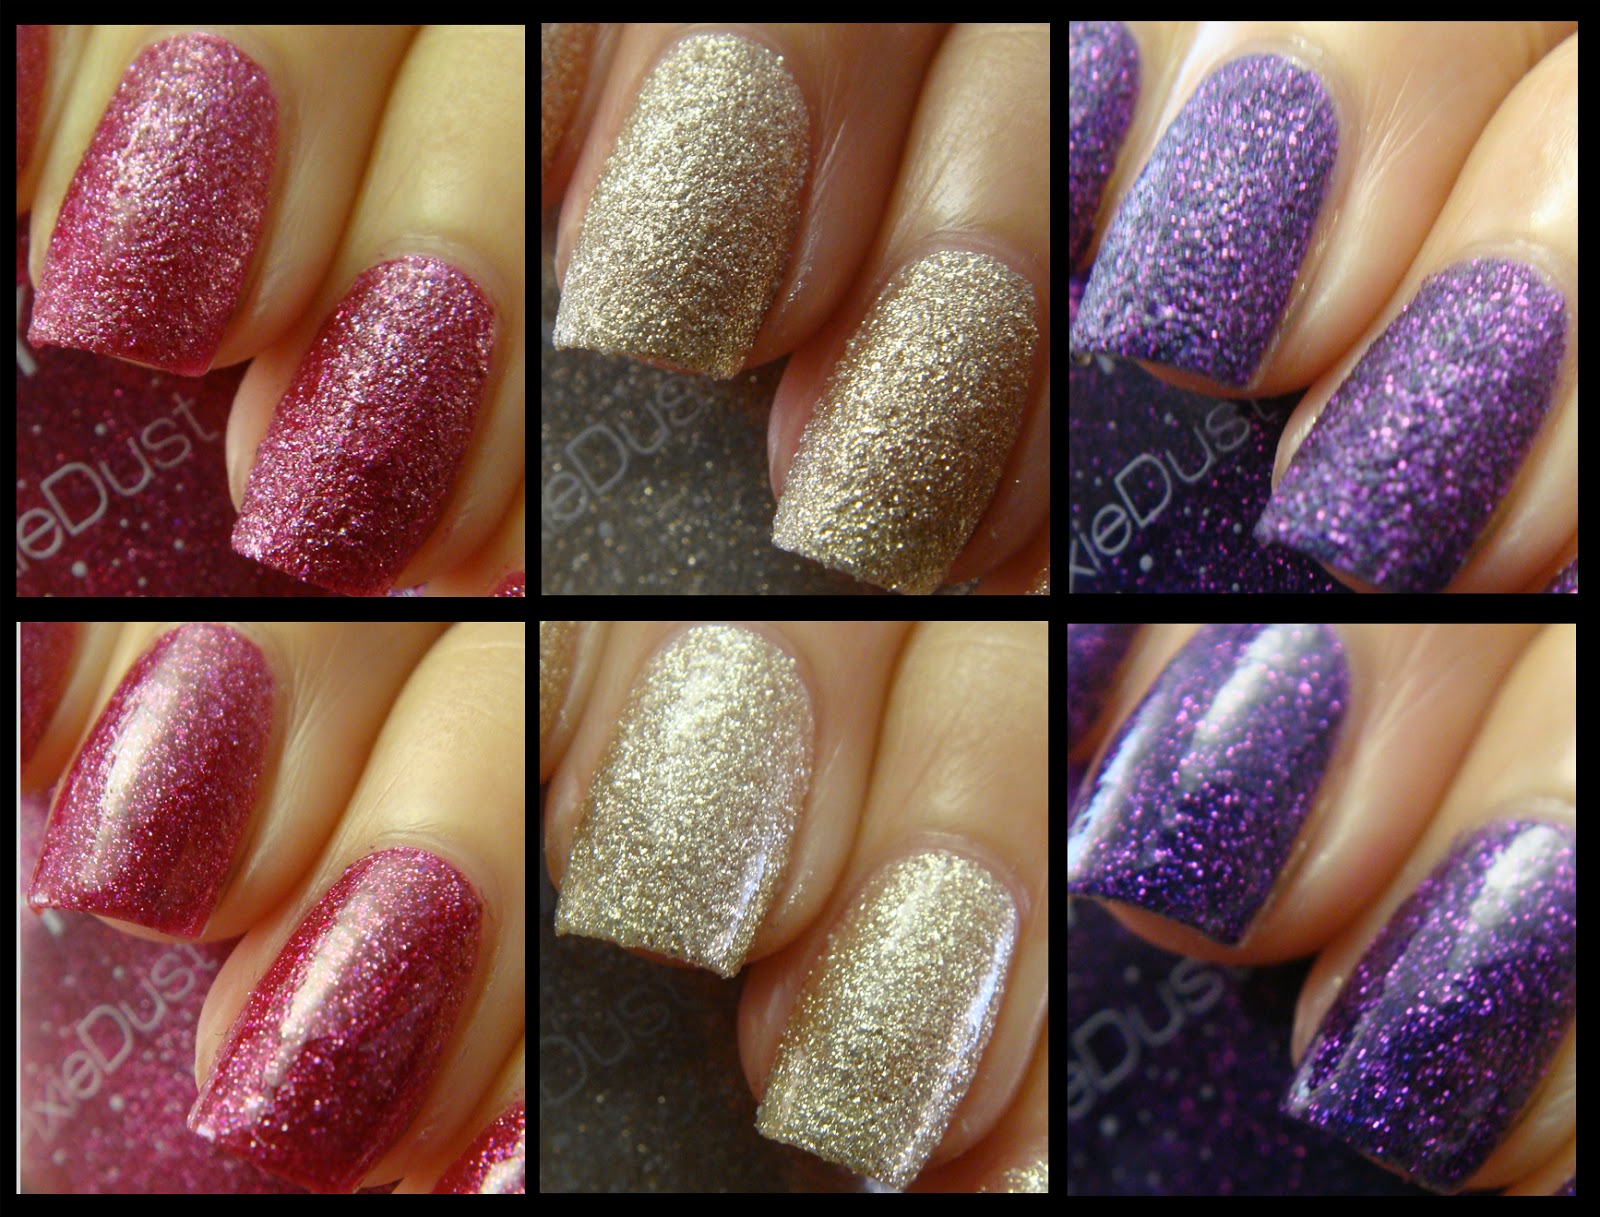
Today I want to share with you some of my new Zoya Pixie Dust from their fall collection. I really liked all the they have came up with in the past, and still need to add some of my favorite into my collection. Arabella, Tomoko, and Carter, these are the 3 pixies from this collection that caught my eyes. All my photos here were taken in a light box. I will be showing swatches with and without top coat. If you prefer to wear it with top coat, I would suggest to use gelous or glitter tamer top coat. I used 2 coats of OTD here, and noticed they are thirsty glitter, at least Carter is! That's the one I wore last, so I was able to notice it.


Arabella, a fuchsia red textured glitter with matte finish. Very opaque! I could easily got away with just 1 coat, but I used 2 coats here to get extra depth for the pics. I think this shall be my next pedi color ;)


Zoya Arabella - no tc

Zoya Arabella - with tc

Tomoko, a very sparkly silvery champagne shade. Although I like this one very much, I don't think my skin tone can pull it off *sad* But I doubt that'd stop me from wearing it :p. I used 3 thin coats here. For me, top coat doesn't change the look of this one at all, other than the obvious smooth surface. I prefer this without top coat.


Zoya Tomoko - no tc

Zoya Tomoko - with tc

Carter, a dark purple base with tons of sparkly royal purple glitter. My top favorite of all three! I used 2 coats here. First coat seemed like it's so thin that it would need 3 coats, but the second coat gave a perfect coverage! I love how the purple glitter sparkles under top coat. It looks amazing with or without top coat!


Zoya Tomoko - no tc

Zoya Tomoko - with tc

So which one(s) are your pick from this collection? 
If you are a Canadian polish addict lover like me, you can get your Zoya nail polish from Nail Polish Canada. That's where these 3 prettys came from :) 

XO
Novi

Thursday, August 1, 2013

Hearts & Diamonds Gradient

Hi guys!


Today I want to share with you this gradient mani with a twist. I've seen this look floating around on instagram, not exactly the same one, just the idea, and I wanted to try it. I did this late last night, and now in the light of day, I can see the imperfection more clearly..oh well. 
Also, sorry about my yucky cuticles. Some of them have been so stubborn! I don't clip my cuticles, usually I just moisturize and soften them so I can push it back. But that doesn't seem to do the trick, they are extra dry and some are a little ragged :( We'll see, hope I could fix this soon. It bothers me so much! 

Anyway, here it is..


Products used:
piCture pOlish Tiffany
Zoya Rocky
OPI Suzi's Hungary Again!

Quick explanation of what I did to get this look, first off, I did the normal sponge gradient over a white base with all 3 shades, top coat and let them dry.
Then, I made a heart shaped hole on a scotch tape, placed it on a fully dry nail, and sponged another gradient but with only 2 shades, the top and bottom ones. Same goes with the diamond print.
I waited until the second gradient is dry before top coating it, as I was afraid it would smear if I didn't. Thats it!!


What do you think? Love it/hate it? Will you try this look? I think it's really cool, plus you can just do whatever shape you want or easier to make.

XO
Novi

Thursday, July 25, 2013

Orly Glowstick (And Some Nail Art)

Hi guys!

Summer doesn't feel complete without some in-your-face neon nails, and I have just the perfect polish for it! Orly Glowstick. What an appropriate name for this polish!

As most of neon polish does, this tend to be a bit streaky to wear on its own, and I just don't feel like dealing with streaky polish. So I layered it over white polish. I used 2 thin coats and it looks perfect! Well, aside for the rubbery finish, but that an easy fix, apply top coat, and voila! I have a glossy neon mani.

As expected, my camera freaked out a bit. It's a bit more brighter in person, and the yellow is like highlighter yellow to me.

Orly Glowstick

Orly Glowstick
And then (of course) I added a little bit of nail art. I used Bundle monster BM-319 from 2012  collection set, and stamped with Zoya Hazel. I think of it like a filter for the brightness, although it doesn't really help much, but that's a good thing I guess :p


All my polishes and stamping plate I used here were purchased from Nail Polish Canada. They are currently offering free shipping with no minimum to anywhere in Canada. Go check them out! :)
What do you think of the stamping combo I used? The design looks subtle, but I personally love it!

XO
Novi