Sunday, June 29, 2014

piCture pOlish Swagger

Here's another NOTD post! I'm so glad I finally could get my hands on this polish, I knew I would love it, I just didn't think I would love it THIS much! Picture Polish Swagger is *the* perfect periwinkle blue. As an added bonus, the formula is perfection! 2 easy coat, glossy finish (though I still use top coat).
I have been wearing this for one full day and I still find myself staring at my nails in awe, such a pretty shade. I don't even get tempted to cover it up with nail art or glitter or whatever. That's how much I love this. I will still be sporting this until it's time to change and do a Canada Day mani. 


piCture pOlish Swagger

piCture pOlish Swagger

piCture pOlish Swagger
For Canadians, Picture Polish can be purchased from Nail Polish Canada or Harlow&Co.. You can also order directly from Picture Polish, or check out their other distributor, the list can be found on the network tab on their page.

XO
Novi

Thursday, June 26, 2014

NOTD: Girly Bits No Such Thing As A Purple Problem

Today's NOTD post is a stamping over glitter gradient. This combination is always seem to be my go-to when I need something easy but not looking too boring. 
The star of this mani is one of my new Girly Bits, No Such Thing As A Purple Problem, a new addition to their core line that was released with the latest collection, 80's Girl Bands.


No Such Thing As A Purple Problem is a grape purple jelly filled with holo micro glitter and gorgeous shimmer. It's my kind of polish! It was a bit patchy in first coat, but the second coat totally even it out. 
I sponged Razzle Dazzle in about 1/3 part of the nails on the tips then top coat it to give a smooth surface to stamp. I used the image from MoYou Pro Plate Collection 01 and Mundo de Unas Black, then finished it with another coat of HK Girl top coat. Although I used 2 coats of top coat here (before and after stamping), 1 coat is enough to give a smooth finish.


If you're a micro glitter lover, or just love anything sparkly or purple, then you NEED this polish! Harlow & Co. will be restocking this within this week (as this post is written), and you could also buy this directly from Girly Bits.


XO
Novi

Tuesday, June 24, 2014

Swatches: Girly Bits Neutron Dance & Supersonic

I'm back! Today I have 2 of the new Girly Bits 80's Girl Bands collection. I picked out almost half of this collection, and right now I'm showing you the 2 crelly, Supersonic and Neutron Power. I really like every single bottle I got, even thinking to get 2 more that I skipped on pre-order. 
I'm really impressed by this collection and Pam's creativity. This collection made me look up all the inspiration used in creating these polishes. Yes, I admit.. I'm not familiar at all with these 80's band, my love for music started in the 90's. 

Let's look at pictures, shall we?

Neutron Dancea flourescent pink crelly base with neon pink, yellow and green hexes and squares, accented with silver holo sparks. This is one of those pinks that I love and wish it would look good on me as it is on the bottle. I had no issue with application, the glitter distributed nicely in the bottle and I was able to get a decent amount of random glitter on the brush on every dip. It was opaque in 2 coats, but I used 3 coats out of habit. The glitter made the finish a bit bumpy, so top coat is definitely needed. I used 2 coats of Clearly on Top.


Girly Bits Neutron Dance

Girly Bits Neutron Dance

Girly Bits Neutron Dance

Supersonica neon lime green jelly with golden and blue shimmer, and tiny blue flecks. This one is a win for me between the two! It's bright without looking too blinding, and the shimmer is just gorgeous! I notice this dries slightly slower than Neutron Dance, I had to wait a bit longer between each coat. I used 3 coats and 1 coat of Clearly on Top.


Girly Bits Supersonic

Girly Bits Supersonic

Girly Bits Supersonic

Girly Bits Supersonic
The 80's Girl Bands collection is available to purchase from their website, and also (or soon will be available) through the following Girly Bits' distributors:
Harlow & Co. (Canada)
Llarowe (USA)
Mei Mei's Signatures (Singapore)
Overall Beauty(USA)
Femme Fatale (Australia)
Foxy Fingertips (Denmark)
Maria Gastaderia (Brazil)
Rainbow Connection (United Kingdom)

XO
Novi

Friday, June 20, 2014

Swatches & Review: Smokey Mountain Lacquers - Raging Hormones

Hi guys! Today I have for you a new to me indie brand, based in USA, Smokey Mountain Lacquers. The polish I'll be showing you today from their line is called Raging Hormones. Do I need to tell you what inspired the name? Lol! 

Raging Hormones is described by the creator as a cherry red linear holo polish. I have to say, on me it's not really a deep dark red like cherry. It leans a bit orange-y red. The formula is on the thick side, but I have no issue in application. It dries shiny, but I still use top coat here. I used 3 thin coats for my swatches. 
Smokey Mountain Lacquer Raging Hormones


Smokey Mountain Lacquer Raging Hormones

Smokey Mountain Lacquer Raging Hormones

Smokey Mountain Lacquer Raging Hormones
There's a disclaimer on the listing of this polish, that it might stain. Unfortunately it did  stain. I used 2 coats of Glisten & Glow Stuck on Blu and wore this for no more than 6 hours. When I removed them my whole nail beds are pink stained. So you might have to take an extra precaution before wearing this, or don't plan on wearing sheer polish right after this.

Smokey Mountain Lacquers can be purchased from their website or etsy. Retails for USD 7.95 for a full size 15 ml bottle and USD 3.95 for a 5ml mini bottle. For nail polish lovers outside US, I recommend contacting them prior of placing your order, regarding shipping method and rate, you can do that here. You can also follow Smokey Mountain Lacquers on their social media (facebook, instagram)for updates about new collection, restock, and giveaways! 


**product is provided for my honest review
XO
Novi

Wednesday, June 18, 2014

Twin Post with PJ's and Polish - Rainbow Mani

Today's post is the first for me. Debbie (from PJ's and Polish) and I planned to do this -twin post a little while ago, and now it's finally live! We're calling this a 'twin post', but instead of doing the exact same mani, we picked a theme and do our own interpretation of it, and the theme is, as the title says, Rainbow Nails! We're both also using chevron minis from Nail Vinyls.

Debbie is one of my close friend in nail polish and blogging world, I'm so stoked to do this twin post with her. She does beautiful swatches, go and see for yourself, and also check out her version of our Rainbow Nails here.

Here's my version. I used a total of 8 colors for this (not including the white base).

I started this mani with a 3 colour gradient over a white base, yellow (Zoya Darcy), blue (Zoya Yummy), and purple (Picture Polish Wisteria), and top coat it before I start with the vinyls. I placed 4 mini chevron vinyls on each nail to create a small zigzag pattern and fit more colours. As the lines are pretty thin, I used a small brush to fill between the vinyls. The shades used are OPI Red My Fortune Cookie, Picture Polish Totes, KB Shimmer Honeydew List, Picture Polish Sky, and OPI Push & Pur-Pull. I just got a fresh new bottle of INM Northern Lights, so I just had to use it! Sparkles make everything 10x better!


Hope you enjoyed the post! 

XO
Novi

Monday, June 16, 2014

Swatches: KB Shimmer Early Summer 2014 - The Textured

Hi guys! Today I have swatches of my recent purchase from Harlow & Co., the textured glitters from KB Shimmer Early Summer 2014 collection. These are bold colours and jam packed with glitter, I didn't have issue with application at all! 

I used three coats of all the polishes for the swatches here. The jelly base is really saturated, two coats would've given you a good opacity. I used three out of habit when using crelly glitter. Dry time is pretty quick, I found Partners In Lime has the quickest drying time followed by She Twerks Out and Too Pop To Handle. 
Even though these are meant to be textured polishes, you can always add top coat for a glossy smooth finish, and change the semi matte original finish. But keep in mind, these are top coat eater glitter. You will need 2 generous coats of good quality top coat to get a smooth finish. 

Partners In Lime, is a bright lime jelly base filled with green, aqua blue, and gold hexes. It's an 'in your face' green, LOVE this a lot! 
KB Shimmer Partners In Lime

KB Shimmer Partners In Lime (with top coat)

Too Pop To Handle, is a bright purple jelly loaded with magenta, pink, aqua, and violet hexes glitter. I've worn this one for a full mani. I like this with top coat, so I only used 1 coat of top coat and I got the glossy look I like and still had the textured finish. 
KB Shimmer Too Pop To Handle

KB Shimmer Too Pop To Handle (with top coat)

She Twerks Out, a turquoise jelly filled with aqua, violet, lime green, and teal hexes glitter. I'm currently wearing this as my pedi colour. It looks fantastic! I just don't think about removal and I'm happy! ;)
KB Shimmer She Twerks Out

KB Shimmer She Twerks Out (with top coat)
Honestly, I can't pick a favorite out of these three. I love them all! Which one(s) is your favorite?
KB Shimmer polishes can be purchased directly at KB Shimmer website (US only) and from Harlow & Co. (worldwide shipping).

XO
Novi

Friday, June 13, 2014

Floral Nails

As summer approaching, I'm seeing more and more of floral nail art. It's not something I'm particularly good at, I seriously have trouble even making a dotted flower. But it doesn't stop me from trying, so please be gentle ;)


I started with KB Shimmer Honeydew List as the base, a dusty light green that's opaque in 3 coats. For the flowers, I used a flat end brush and a combination of these shades: Picture Polish Violet Femme, Flirt, Zoya Thandie, Darcy, Chantal, OPI My Boyfriend Scales The Walls and Jade is The New Black for the green stems. 


I think they came out pretty nice, if you don't pay too much attention to the details..haha. It has a bit of vintage look to it, which I now think matte top coat would be perfect for this. What do you think? :)

XO
Novi

Wednesday, June 11, 2014

Ants Attack!

Hi guys! Yesterday I received my first Mundo de Unas (MdU) stamping polishes in the mail, 12 of them. So naturally I just had to try them right away. 

I started with a neutral base, using Lime Crime Milky Ways. I used 2 images from Pueen 45 for this mani, the one on top of the plate that looked like a cracked surface and the small ant on the bottom right. I thought those 2 images would be a good match. Just don't try to squish your screen, ok? :p

I used several colors to stamp the larger image. They are MdU #5, 16, 21, 39, and 50, and stamp the ant over it with MdU #2. Finished the design with my favorite top coat, HK Girl from Glisten & Glow. 


From this first try, Mundo de Unas lived up to expectation, the good and the bad. The good, stamps VERY well and very opaque. I tried to use as little as possible as suggested, and it still spread evenly. I have to try them over a dark base next time. 
The only bad is the smell. Although I have to admit, it's not as bad as I thought it would be, but still there's a weird smell. Kinda like gasoline but not as bad, it didn't bother me.

Monday, June 9, 2014

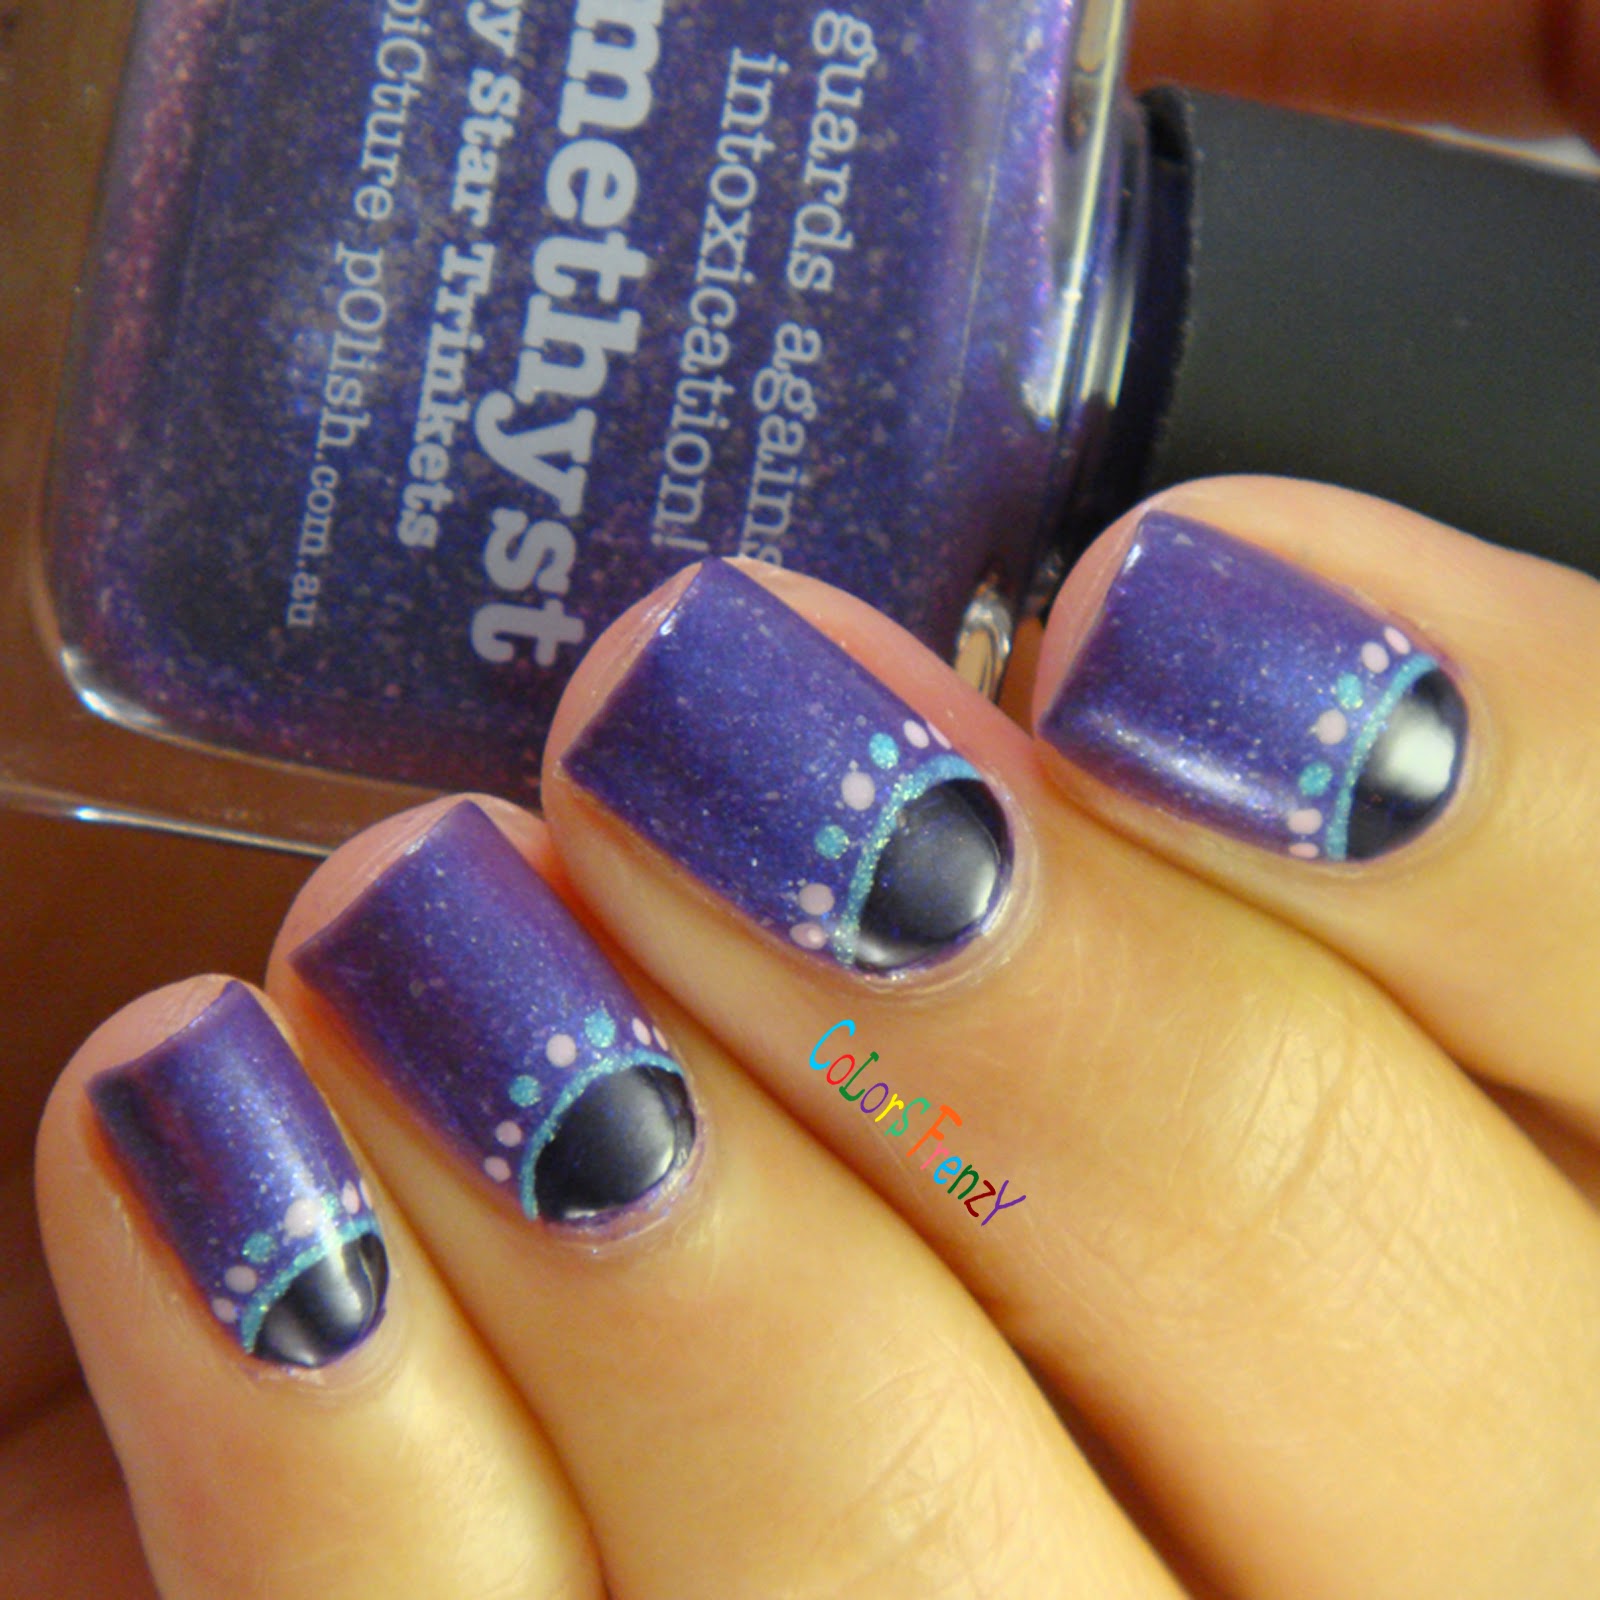
piCture pOlish Amethyst

Monday is almost over, and I just got around to finish my Monday mani post. My pick for today's manicure is from my untried stash, one that I've been meaning to wear but for some reason I always remember it after I finished painting my nails! 

The star of today's post is piCture pOlish Amethyst, this was recently got re-released, and it's a good thing cause it is such a gorgeous shade! A medium purple with piCture pOlish signature white flakes and blue shimmer that's hard to capture. This looks much more interesting in person. 
piCture pOlish Amethyst

I jazzed it up a it with a simple half moon and shimmery dots around it, all using piCture pOlish shades. I free handed the half moon with Aphrodisiac, and outlined it with Whimsy. The dots around it are with Whimsy and Twinkle.

piCture pOlish Amethyst

piCture pOlish Amethyst
All the shades I used here can be purchased either from Nail Polish Canada, Harlow & Co, or directly from piCture pOlish. There are more network e-tailers for piCture pOlish, you can check it out here.

XO
Novi

Friday, June 6, 2014

Jindie Nails Pink Stilettos

I'm back today with another new polish I recently purchased from Harlow & Co., this one is Pink Stilettos by Jindie Nails. This is a shade created in collaboration with Ria from Polishaholic Ria G. As soon as I found out who Jen collaborated with to create this shade, I knew the name has nothing to do with shoes :)

Pink Stilettos is a crelly pink with subtle scattered and linear holographic sparkles, there's also hints of gold shimmer in it. I think it's a polish that can be worn for any occasion. It's feminine and girly, and still suitable for formal work nails. Against my skin tone, it looks a bit dusty and I consider this as neutral shade. Application was a breeze. I used 3 coats and 1 coat of HK Girl.


Jindie Nails Pink Stilettos

Jindie Nails Pink Stilettos

Jindie Nails Pink Stilettos

Jindie Nails Pink Stilettos
Have a great weekend! :)

XO
Novi

Thursday, June 5, 2014

BPS Water Decals Review & Neon Mixed

Hi guys! Another late night post here.. I have been postponing this post for a few days, it's not often that I get a not too great experience in trying new nail related product. But I guess, there's always a first to everything. 
This is my first experience playing with nails water decals, I have always preferred stamping or free hand nail art, but I've seen so many beautiful mani created with water decals, whether it be just one or two accent nails, or full manicure. So when BornPrettyStore asked me to choose products to review, I chose water decal as one of them. I played around with temporary tattoos when I was a kid, it worked the same as the instruction on the decal, so I thought this should be a quick one to do. I was wrong. 


The decal I received can be found here, item #1580. The set came as 1 sheet of sticker that you can cut out into 10 pieces. No room for error here if you're planning to do a full mani with it. I followed the instruction, paint the base color and let them dry (which I found out that it has to be white because the decal is not opaque), wet the nail surface and soak the decal 10-20 secs in a lukewarm water, place the decal on the nail. After this step, I find that sometimes the decal stick to the nail and sometimes it doesn't. 
I waited until the decal is completely dry before applying top coat. Here where I get more issues. I tried 3 different top coat, 2 quick dry and 1 regular top coat. 1 of the quick dry top coat just didn't work, it totally melted the decal. The other two gave a similar result as you can see on my index and middle nail, they gave the 'distressed' look. 


I ended up using the decals for 2 accent nails, since I pretty much ruined the rest of them. It took longer for me to apply 2 decals than to do the other 3 nails. I did a dry brush technique using 4 OPI Neons. 


I know a lot of you had good experience with water decals, maybe I just happen to get a dud? Anyway I won't boycott it entirely, but I sure won't try it again anytime soon! Lol. I do have another set that's not a full nail decal, and I got it elsewhere. Gonna try that when I forget about this one. 
What are your thoughts? 

xo
Novi

Tuesday, June 3, 2014

Models Own Sun Hat & Flip Flop

Hi guys! Today I have two neon polishes from the summer collection, Polish For Tans by Models Own. These two are my first polishes from the brand, and I think I made a great first choice (or bad? depends on how you look at it :p) cause now I'm thinking of getting more of them.

Sun Hat is a neon bubblegum pink. It looks a bit shy in these pics, but in person, you'll have no doubt that this *is* neon. The formula is on the thick side but still applies quite nicely, especially for a neon. White base is not required. My swatches are with 3 coats, but with careful application, 2 coats would be enough. This doesn't dry matte as most neons do, but I'd still use top coat. 

Models Own Sun Hat

Models Own Sun Hat

Models Own Sun Hat
Flip Flop, a bright neon green. These pics are quite accurate in color, but it could look even brighter in certain lights. This is love at first swatch for me. The formula is slightly thinner compared to Sun Hat, and it dries to a matte finish, so top coat is definitely required. My swatches are with 3 easy coats, no white base required. 
Models Own Flip Flop

Models Own Flip Flop

Models Own Flip Flop
These shades really look flattering on my warm skin tone, makes me want to get more from this collection. In Canada, Models Own polishes can be purchased from Nail Polish Canada (they ship to US too!). If you're still on the fence whether you need these or not, I say go for it! :)

XO
Novi