Monday, June 9, 2014

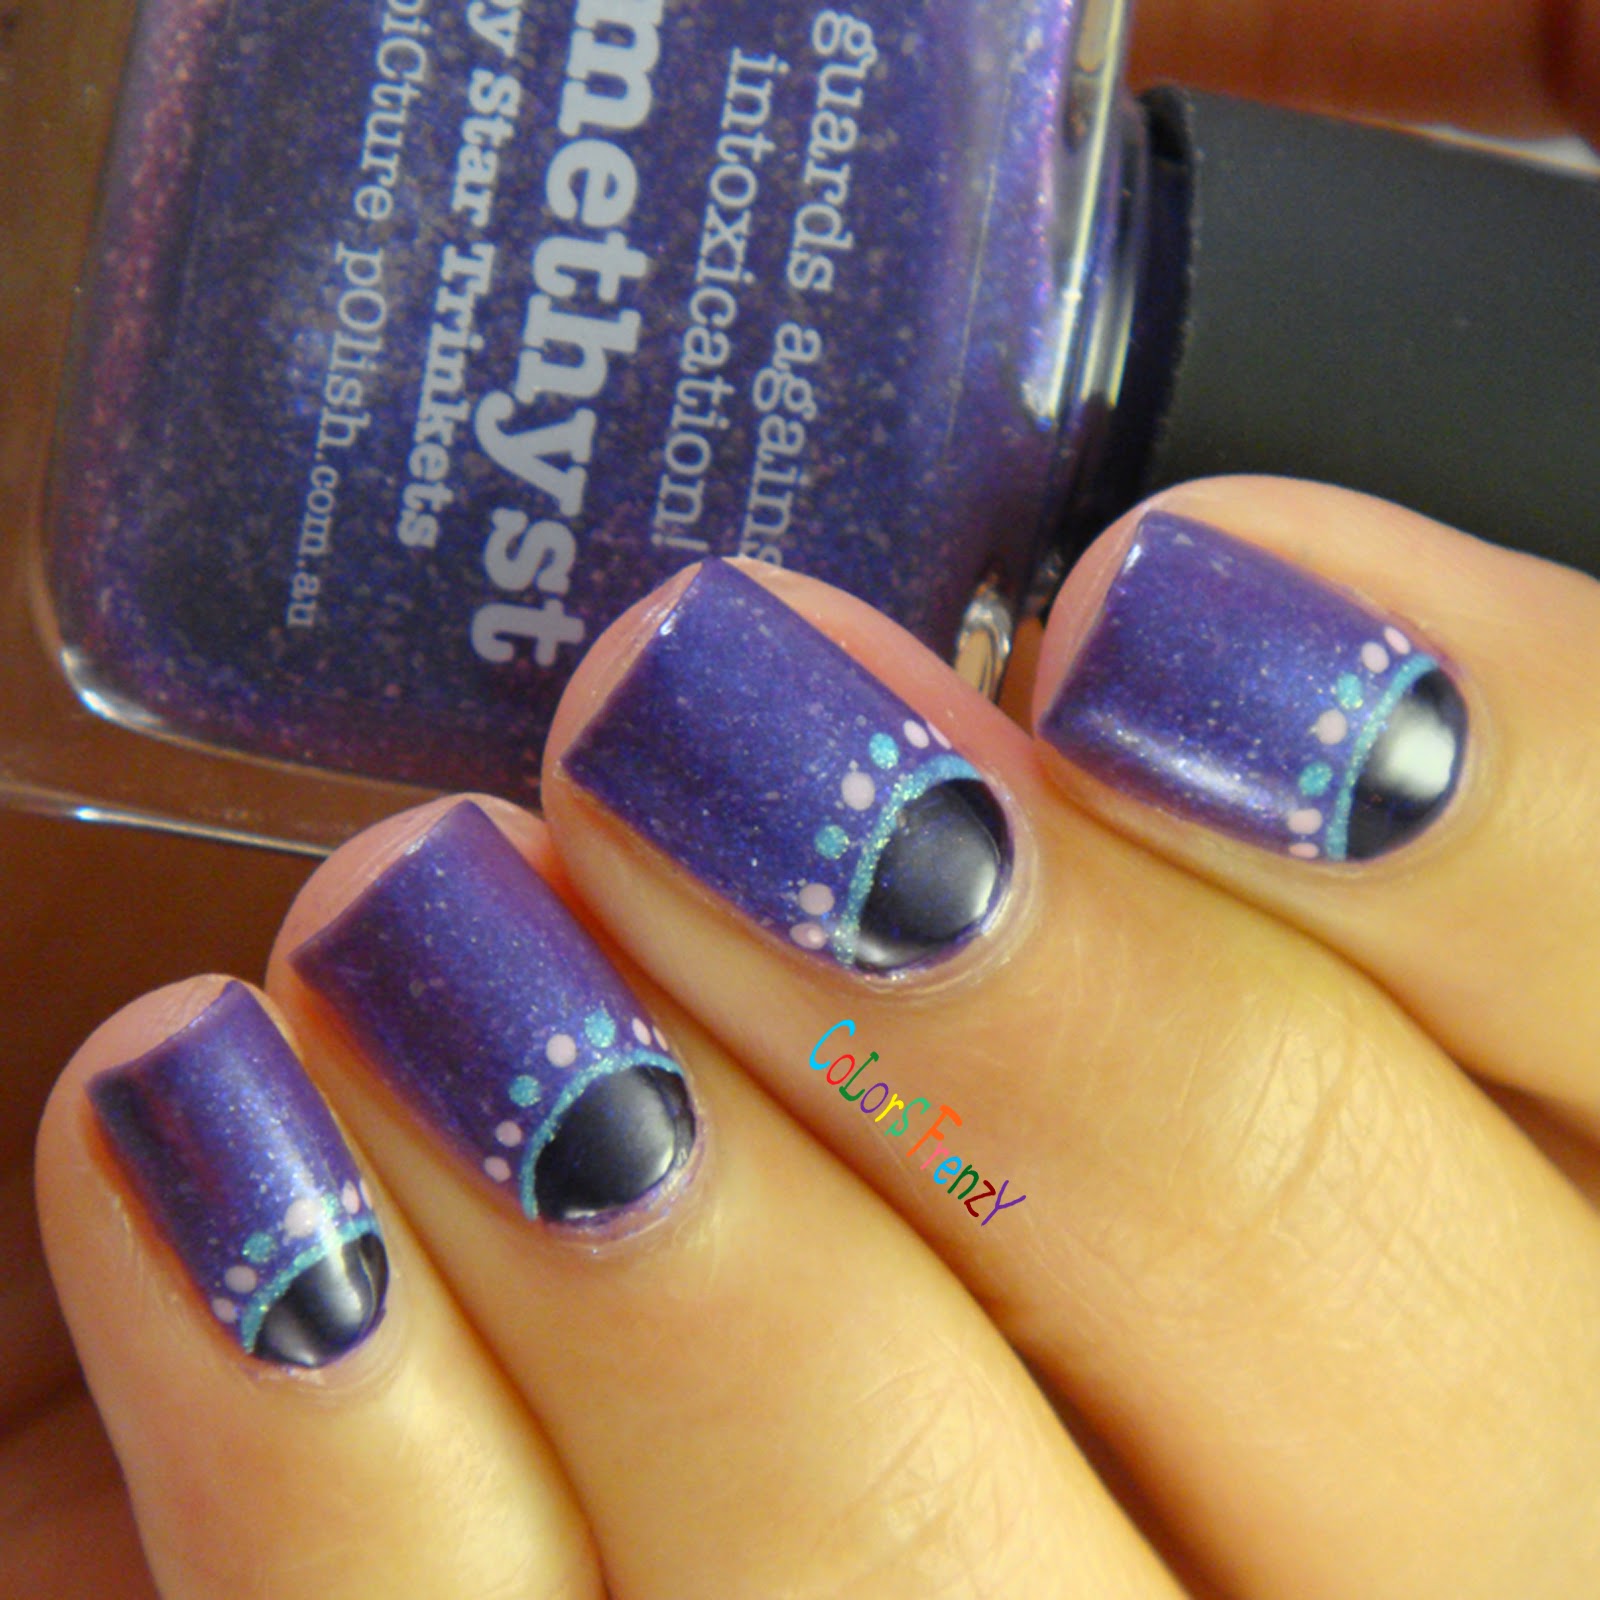
piCture pOlish Amethyst

Monday is almost over, and I just got around to finish my Monday mani post. My pick for today's manicure is from my untried stash, one that I've been meaning to wear but for some reason I always remember it after I finished painting my nails! 

The star of today's post is piCture pOlish Amethyst, this was recently got re-released, and it's a good thing cause it is such a gorgeous shade! A medium purple with piCture pOlish signature white flakes and blue shimmer that's hard to capture. This looks much more interesting in person. 
piCture pOlish Amethyst

I jazzed it up a it with a simple half moon and shimmery dots around it, all using piCture pOlish shades. I free handed the half moon with Aphrodisiac, and outlined it with Whimsy. The dots around it are with Whimsy and Twinkle.

piCture pOlish Amethyst

piCture pOlish Amethyst
All the shades I used here can be purchased either from Nail Polish Canada, Harlow & Co, or directly from piCture pOlish. There are more network e-tailers for piCture pOlish, you can check it out here.

XO
Novi

Friday, June 6, 2014

Jindie Nails Pink Stilettos

I'm back today with another new polish I recently purchased from Harlow & Co., this one is Pink Stilettos by Jindie Nails. This is a shade created in collaboration with Ria from Polishaholic Ria G. As soon as I found out who Jen collaborated with to create this shade, I knew the name has nothing to do with shoes :)

Pink Stilettos is a crelly pink with subtle scattered and linear holographic sparkles, there's also hints of gold shimmer in it. I think it's a polish that can be worn for any occasion. It's feminine and girly, and still suitable for formal work nails. Against my skin tone, it looks a bit dusty and I consider this as neutral shade. Application was a breeze. I used 3 coats and 1 coat of HK Girl.


Jindie Nails Pink Stilettos

Jindie Nails Pink Stilettos

Jindie Nails Pink Stilettos

Jindie Nails Pink Stilettos
Have a great weekend! :)

XO
Novi

Thursday, June 5, 2014

BPS Water Decals Review & Neon Mixed

Hi guys! Another late night post here.. I have been postponing this post for a few days, it's not often that I get a not too great experience in trying new nail related product. But I guess, there's always a first to everything. 
This is my first experience playing with nails water decals, I have always preferred stamping or free hand nail art, but I've seen so many beautiful mani created with water decals, whether it be just one or two accent nails, or full manicure. So when BornPrettyStore asked me to choose products to review, I chose water decal as one of them. I played around with temporary tattoos when I was a kid, it worked the same as the instruction on the decal, so I thought this should be a quick one to do. I was wrong. 


The decal I received can be found here, item #1580. The set came as 1 sheet of sticker that you can cut out into 10 pieces. No room for error here if you're planning to do a full mani with it. I followed the instruction, paint the base color and let them dry (which I found out that it has to be white because the decal is not opaque), wet the nail surface and soak the decal 10-20 secs in a lukewarm water, place the decal on the nail. After this step, I find that sometimes the decal stick to the nail and sometimes it doesn't. 
I waited until the decal is completely dry before applying top coat. Here where I get more issues. I tried 3 different top coat, 2 quick dry and 1 regular top coat. 1 of the quick dry top coat just didn't work, it totally melted the decal. The other two gave a similar result as you can see on my index and middle nail, they gave the 'distressed' look. 


I ended up using the decals for 2 accent nails, since I pretty much ruined the rest of them. It took longer for me to apply 2 decals than to do the other 3 nails. I did a dry brush technique using 4 OPI Neons. 


I know a lot of you had good experience with water decals, maybe I just happen to get a dud? Anyway I won't boycott it entirely, but I sure won't try it again anytime soon! Lol. I do have another set that's not a full nail decal, and I got it elsewhere. Gonna try that when I forget about this one. 
What are your thoughts? 

xo
Novi

Tuesday, June 3, 2014

Models Own Sun Hat & Flip Flop

Hi guys! Today I have two neon polishes from the summer collection, Polish For Tans by Models Own. These two are my first polishes from the brand, and I think I made a great first choice (or bad? depends on how you look at it :p) cause now I'm thinking of getting more of them.

Sun Hat is a neon bubblegum pink. It looks a bit shy in these pics, but in person, you'll have no doubt that this *is* neon. The formula is on the thick side but still applies quite nicely, especially for a neon. White base is not required. My swatches are with 3 coats, but with careful application, 2 coats would be enough. This doesn't dry matte as most neons do, but I'd still use top coat. 

Models Own Sun Hat

Models Own Sun Hat

Models Own Sun Hat
Flip Flop, a bright neon green. These pics are quite accurate in color, but it could look even brighter in certain lights. This is love at first swatch for me. The formula is slightly thinner compared to Sun Hat, and it dries to a matte finish, so top coat is definitely required. My swatches are with 3 easy coats, no white base required. 
Models Own Flip Flop

Models Own Flip Flop

Models Own Flip Flop
These shades really look flattering on my warm skin tone, makes me want to get more from this collection. In Canada, Models Own polishes can be purchased from Nail Polish Canada (they ship to US too!). If you're still on the fence whether you need these or not, I say go for it! :)

XO
Novi

Sunday, June 1, 2014

NOTD: Enchanted Polish March 2014

Happy Sunday! Hope everyone is having a wonderful and relaxing weekend :)
Just a quick post here to share this mani I did yesterday. I'm still wearing it today, so it counts as a NOTD post, right?

March 2014 is a light green linear holo with a strong gold holo effect that makes it look more chartreuse under the sun. I used 3 thin coats here with HK Girl top coat. 
The neon green glitter you see on my tips was made by a good friend of mine who also makes handmade, custom blended hand and body products, Les Creations Maja. You can check out her products here. She creates polishes as a hobby, and I'm lucky enough to get to try them.
Enchanted Polish March 2014 

I think these polishes look so good together! If you're following me on Instagram, I posted a pic I took with my phone yesterday when I was out in the sun. The holo looks amazing, and the glitter really pop! Love them! <3
Enchanted Polish March 2014


XO
Novi