Thursday, February 27, 2014

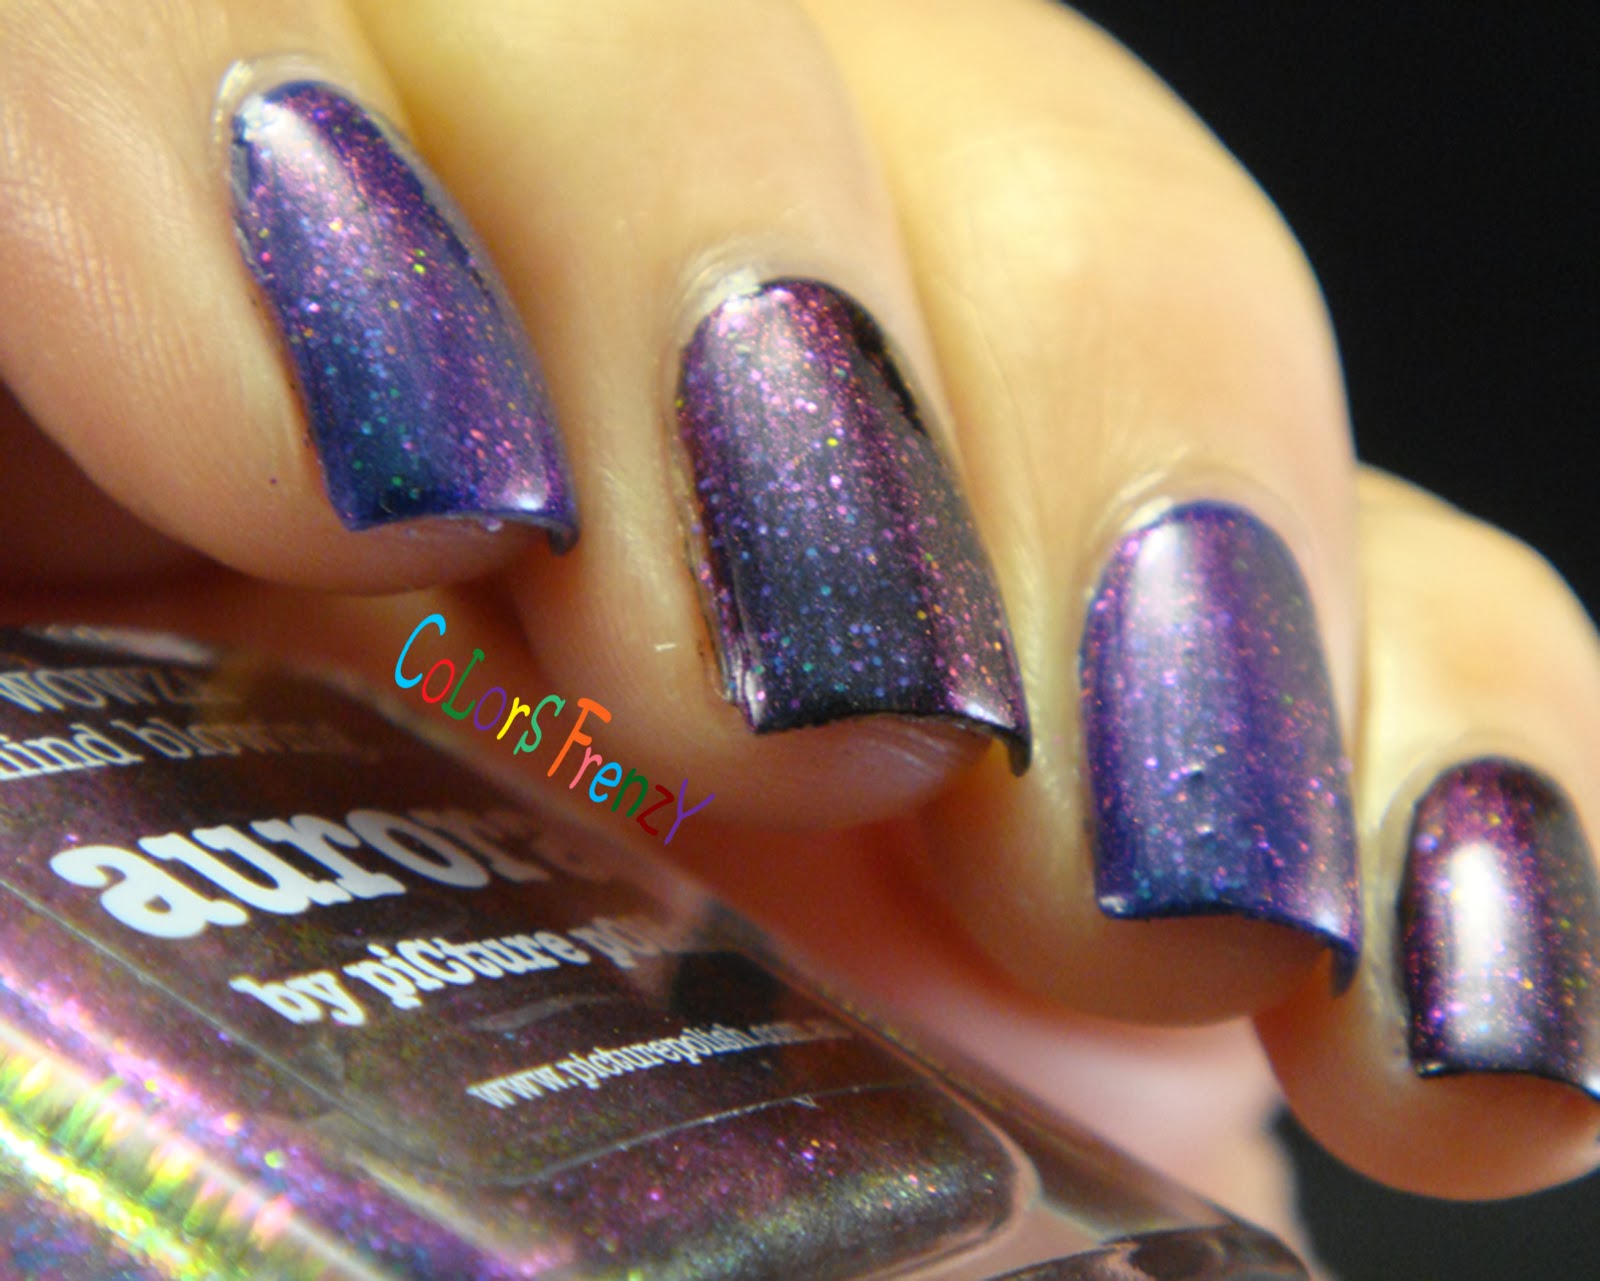
Swatches: piCture pOlish Aurora

Hi guys!

Today I'm showing you swatches of my new piCture pOlish. As you probably already know, recently piCture pOlish released 5 new limited edition shades, and they sold out pretty quick. I only bought one that interest me the most, Aurora. These polishes are suggested to be worn over black, and most swatches out there are shown in that combo. I'm wearing mine as a full mani over a blue base instead (OPI Eurso..Euro), but I will also show it over both black and blue so you can see the difference. I think both look just as gorgeous!

I went a little overboard with pictures here, so apologize if the page load a bit slower for you. As I'm typing this post, in a low natural lighting, I can see my nails shifts from green to purple. It's really slowing things down you know, typing, looking at my nails, typing again.. lol.


piCture pOlish Aurora
(over OPI Eurso..Euro)

piCture pOlish Aurora
(over OPI Eurso..Euro)

piCture pOlish Aurora
(over OPI Eurso..Euro)

piCture pOlish Aurora
(over OPI Eurso..Euro)
Here I'm layering Aurora over black on my middle and pinkie


piCture pOlish Aurora
(over black and blue)

piCture pOlish Aurora
(over black and blue)

piCture pOlish Aurora
(over black and blue)

piCture pOlish Aurora
(over black and blue)
Currently, Aurora is sold out in most places as far as I know. But there will be 1000 bottles more coming in March, so stay tuned! Follow piCTure pOlish on facebook so you don't miss the announcement. Also, check out their network page to find a retailer closest to you. I purchased mine from Nail Polish Canada. You should also check out these retailers who carry this brand and ship worldwide such as Harlow & Co. and Llarowe.

XO
Novi


Tuesday, February 25, 2014

Spring Stamping & Gradient

Hi guys!

Today I'm playing with MoYou plate again. It was unplanned actually, I was only wanted to do a gradient, but then I got carried away.. lol. Anyway, I really like how it turned out. Makes it feel like spring already!

For the gradient I used Girly BIts Get Weaponized and Razzle Dazzle over a white base, and stamped over it using plate 09 from Suki Collection with OPI Alpine Snow. I used a coat of HK Girl top coat before and after the stamp.


Just the gradient :)


XO
Novi

Monday, February 24, 2014

NOTD: KB Shimmer Snow Much Fun

Happy Monday!

Another quick post, sharing my NOTD. I actually had this on since yesterday, but feeling a little under the weather and too lazy to take pictures until today. This mani is so weather appropriate, it was snowing here the whole weekend, and still is right now, just a little bit. 
Snow Much Fun is on my top lemming from KB Shimmer blogger collaboration collection, but it always sold out so quick, I had to wait for several restock before finally able to get it. It's a beautiful polish, but I do wish it's a bit more opaque. I'm using 2 thin coat and 1 thick coat here, plus 1 coat of HK Girl top coat.

KB Shimmer Snow Much Fun

KB Shimmer Snow Much Fun

This polish is currently sold out at Harlow & Co., where I got mine. But I'm sure it will be back in stock again along with others KB Shimmer they carry, and possibly the new spring collection! So make sure to like Harlow & Co. on facebook so you don't miss their restock info.

Saturday, February 22, 2014

Koi Fish

Hi guys!

Just a quick post to share my.. uhm.. somewhat a fail mani. It's not too bad, but I'm not liking the color combo, and the reverse stamping I did here. Although, I'm loving the MoYou plate I used. It's from Suki collection, plate 09. I hesitated in buying MoYou plate, but a dear friend lend me one of her plate to try out. I have to say, it's amazing! I'll be using it for another mani, for sure!


The background is a saran wrap mani with piCture pOlish Twinkle, Sky, and Tiffany.


Have a great weekend and stay warm! It's been snowing here all day, so I'll just be watching Netflix in my warm and comfy bed!

XO
Novi

Thursday, February 20, 2014

KB Shimmer Teal Another Tail

Hi guys!

I caught a lazy bug. It's pretty chronic that I didn't even change my mani in 2 days (which is like a week in my world), and what's even worse, I had 3 huge chips on my nails that I didn't bother to fix. It's that bad. Today is still not my day. Believe it or not, it took me 2 hours to get my nails completely done. Somehow I kept screwing things up! Note to self, do not attempt to do nail art in this kind of day. Lol! 

Anyway, I'm wearing this gorgeous KB Shimmer shade, Teal Another Tail, that I got from Harlow & Co. on their recent restock. It looked amazing on the bottle, and translate beautifully on the nails. I added chevron accent on two nails with the help of Nail Vinyls


KB Shimmer Teal Another Tail

KB Shimmer Teal Another Tail

KB Shimmer Teal Another Tail
Hope you have a more productive day than I do! :D

XO
Novi

Monday, February 17, 2014

Stamping Over Rainbow Artsy Backround (with Tutorial)

Hi guys!

Today I have a colorful stamping mani, and a tutorial for you. I've had request to do tutorial for the background of one of my valentines day mani, here. Which is great, cause I was planning to do one myself, just wasn't sure if there's any interest. You'll see that it's really easy and it makes an awesome background for your nail art, or you can just wear it as is or maybe add some fairy dust to it. 
In my previous mani, I used several shades of pinks and red, and a purple. This time I'm using rainbow colors, my favorite! I also stamped over them with Pueen 47 plate and my thick and goopy CND Blackjack. I'm so happy I didn't throw it out, it turned out to be an excellent stamping polish!


The polishes I used here are: OPI My Boyfriend Scales The Walls (white base), OPI Hey Baby, Zoya Darcy, Zoya Josie, Zoya Ricky, Color Club Pucci-licious, and HK Girl top coat.

Here's the step by step pictorial:


(not pictured) Paint all your nails with a white polish, and let it dry.

  1.  Drop a blob of each color you used on a tin foil. The brush I used here is a flat nail art brush. Also, set aside polish remover on a small dish to clean your brush
  2. Over a dry white base, with the first color (here it's pink) randomly do a one stroke with your brush creating several rectangle shape. Do it vertically and horizontally. You might need to dip the brush in remover and wipe it dry on a paper towel before moving to the next color.
  3. Repeat step 2, with the second color (Here it's purple). You can overlap the stroke with the existing ones.
  4. Repeat step 2 with color #3 (here it's green).
  5. Repeat step 2 with color #4 (here it's blue).
  6. Repeat step 2  with color #5 (here it's yellow).
  7. After I did step 2 with all the colors, I went back and repeat the same thing on some of the rectangles, using just light strokes just to make the white background not too visible. This step is optional, if you're happy with how it looks, then you can skip this step. 
  8. Do the clean up (if needed), and add top coat. I like to add top coat right away after I finished each nail. Adding top coat while the polish is not completely dry, kinda soften the brush strokes. But this is also optional.
And that's it!


You can use whatever colors you like, there's no right or wrong in doing this. Which is why I like it a lot. I hope my explanation is clear enough, and if it's not, feel free to shoot me a question in the comment :)
What do you think? Will you be trying this?

XO
Novi

Sunday, February 16, 2014

Weekend NOTD

Happy Sunday!

My last red mani didn't last as long as I expected. That seems to always happen when I planned on wearing them longer than 24 hours. When I removed my mani and thinking of what's next, I decided that I needed something neutral, and my bf got me OPI 18k White Gold & Silver top coat on valentines day. As a nail polish addict collector, I can safely say, nail polish is better than flowers. Don't you agree? lol

The neutral shade I picked is from the new OPI Brazil, Don't Bossa Nova Me Around, and I added one coat of the 18K top coat. I love it.

OPI 18K White Gold & Silver top coat
(over Don't Bossa Nova Me Around)

OPI 18K White Gold & Silver top coat
(over Don't Bossa Nova Me Around)


OPI 18K White Gold & Silver top coat
(over Don't Bossa Nova Me Around)


Hope you're all having a wonderful Sunday!

XO
Novi

Friday, February 14, 2014

NOTD: Red, Gold, and Glitter

Happy Friday!

..and also happy valentine's day <3. It's early here, and I've been seeing so many beautiful mani on my facebook feed. I did mine late last night and went to bed right away, hoping my mani will still look good in the morning, sheet mark free, and it does. This is probably one of those rare occasion where I would wear red nails, but I just had to put on OPI Over & Over A-Gwen that I got with my 3 OPI Brazil. I'm impressed! This is the shade of red that will look flattering on any skin tone, so sexy!
Naturally, I had to 'dress it up' a little. I didn't want anything too busy or flashy. Not like I'd be doing anything today, me and the bf never really celebrate the day. I added a gold vertical chevron using OPI Love.Angel.Music.Baby and Nailvinyls chevron guide. I made a glittery heart silhouette for an accent nail. Overall, I think I achieved the 'simple' look I was going for. 


Hope all of you is having a wonderful day with your loved ones. Stay safe and warm!

XO
Novi

Wednesday, February 12, 2014

Swatches: piCture pOlish Badass

Hi guys!

Tonight I have one of piCture pOlish new collaboration shade. Totally an impulse buy (which I don't regret), as I always tend to choose a brighter shade, but this time I picked the darkest one. But can you blame me? I got to have it just because of the name. So I can say 'I have badass nails!' :p
Anyway, Badass is created in collaboration with Shelly from Sassy Shelly, you can read all about what inspired her and the process in making this polish here

This is one of the first reformulated piCture pOlish, from 3 free to 5 free. This is advertised as a holographic, I believe. But the holo didn't come from spectraflair, which explains why I didn't see any rainbow holo forming in the bottle, just tons of multi color sparkles which actually micro flakies. The formula, as expected, is great. Two coats gave me full opacity, and it's easy to work with. Once on the nail and the light hits it, I could immediately see the holographic effect. It's not a linear holo, more like... A-England kinda holo. Very pretty! 

piCture pOlish Badass

piCture pOlish Badass

piCture pOlish Badass

piCture pOlish Badass
All the new collaboration shades are available to purchase from piCture pOlish website and their network worldwide. Mine was purchased from Nail Polish Canada.

XO
Novi

Tuesday, February 11, 2014

Moonlight Sonata (ShenKen)

Hi guys!


Tonight's post is a little different than usual. Well, I'm still showing you swatches, but it's not from either mainstream or indie brands. 

I recently found out that one of my nail polish buddy is a genius amateur in frankening polish. Unlike me, who only like to paint my nails, she's really good in describing colors, likes experimenting with pigments and such. When she showed me (and a few other people) her latest experiment, I was completely swooned! And maybe showed a little too much excitement, she offered to send me a small sample, and in exchange asked if I would take better pics of it. Well, it's a no brainer! I gladly accepted :).


She named it Moonlight Sonata, it's a royal purple jelly based with shimmer that shifts from purple, blue, and magenta. It's super gorgeous! But really tricky to photograph. I seriously think my pics don't do it justice, it's so much prettier in person. My pics are showing 3 coats with top coat. 


Moonlight Sonata

Moonlight Sonata

Moonlight Sonata

Moonlight Sonata

Moonlight Sonata
 And I added 1 coat of Djinn in a Bottle. It kinda make most of the shimmer disappear, but I can still see the blue shimmer. I also love it with Djinn!


Moonlight Sonata
with EP Djinn in a Bottle

Moonlight Sonata
with EP Djinn in a Bottle

Moonlight Sonata
with EP Djinn in a Bottle
Do you also like to experiment with frankening your old polishes? Or even create a completely new one? What are your thoughts of this one? :)

XO
Novi

Sunday, February 9, 2014

Swatches: OPI Brazil Collection - First Picks

Hi guys!

If you're following me on facebook, you might see a pic of my new OPI from the new Brazil collection that I posted yesterday. I picked up only 3 for now, and still have a few more I wanted. 2 out of the 3 were the bf picks! ;). Let's see pictures! 

All swatches are with 1 coat of HK Girl top coat.

Don't Bossa Nova Me Around, to be honest, nude is never in my top picks when buying polish. This is what the bf picked, and he's picking it because of the name. Wonder if you'd get why, lol. 
Anyway, this turned out to be a very nice nude and I really liked it. It has a dusty pink tone in it and applies really nicely. I thought I would need three coats for this, but two coats gave a perfect opacity.

OPI Don't Bossa Nova Me Around

OPI Don't Bossa Nova Me Around
Next Stop...The Bikini Zone, also picked by the bf, but I also wanted this. It's a (very weak) duochrome, it looks silvery purple most of the time for me, but in some lightning it changed to pewter silver. It also has some purple shimmer which makes it really pretty to me. I used three thin coats, smooth application. 
I noticed in the pics it looked like there are some bald spots. I assure you it is completely opaque in three coats, it's just the light reflection or something. I checked a few times when taking pictures to make sure there are no bald spots on my my nails.

Next Stop...The Bikini Zone

Next Stop...The Bikini Zone

Next Stop...The Bikini Zone
Where Did Suzi's Man-go? definitely my pick! It's a creamy medium orange. Very fitting with the name. Totally reminds me of juicy mango.. oh I can't wait for summer to come! The opposite of the nude, I thought I would only need 2 coats, but I used 3 coats to get a streak free opacity. But keep in mind, my coats are thin. Out of all the orange shades I have, this is now has become my favorite!

Where Did Suzi's Man-go?

Where Did Suzi's Man-go?
If you are in BC area, check out your local Chatters for this collection. Nail Polish Canada will have this collection soon! OPI retails for C$9.95 at Chatters and C$8.95 at Nail Polish Canada.
So, have you decided which ones you will get from this collection? Would any of these 3 be joining your OPI stash? :)

XO
Novi


Saturday, February 8, 2014

Swatches & Review: Jindie Nails To-teally Aussome

Hi guys!


Hope you are enjoying the weekend! To give you a break from all the lovey dovey pink and red mani that you must be seeing a lot lately, tonight I have a gorgeous emerald jelly glitter bomb created by Jindie Nails exclusively for Femme Fatale Cosmetics

To-teally Aussome has a mixed of star, diamond, and different sizes or circles & hexes in teal, pink, green and holographic silver, suspended in emerald green jelly. I used 3 coats for my swatches and a generous coat of HK Girl top coat. The vnl (visible nail lines) you see in the pics are not as visible in person. The only fishing I had to do is to get the stars, other than that I had no issue with application.


Jindie Nails To-teally Aussome

Jindie Nails To-teally Aussome

Jindie Nails To-teally Aussome

Jindie Nails To-teally Aussome

Jindie Nails To-teally Aussome can only be purchased from Femme Fatale Cosmetics, and it is currently out of stock. So don't forget to follow Jindie Nails and Femme Fatale Cosmetics on facebook to keep updated on their restock info. 


XO
Novi

**polish was sent to me for review, all opinions are my own.